Windows下使用 PHP 实现 Coding Webhook 监听
网上查了一堆教程都是 Linux 的,最后自己在 Windows 下尝试实现了项目自动部署,写个笔记记录一下..
这是新博客创建后写的第一篇文章,同时由于从未使用过 MarkDown 语法,还是花了不少的时间去适应的.. 网上找到一篇 Hexo Markdown 简明语法手册 ,作为参考
这篇文章假定你已经在 Windows 下安装好 Git 并设定好账号、项目部署目录,以及 先clone一遍。如果你还没安装,网上有一堆教程,这里就不再废话了。
WebHook 的原理就是当项目触发了指定事件时(例如push),Coding 会以 POST 方式请求你指定好的地址(你写好的 php 接口),其中包含了事件的相关信息,例如 pusher 信息,commit 信息等..
新建WebHook:首先在你的项目页面找到 “设置”-“WebHook”-“新建WebHook”

上图中我打码的那段链接就是我已经添加好的 WebHook
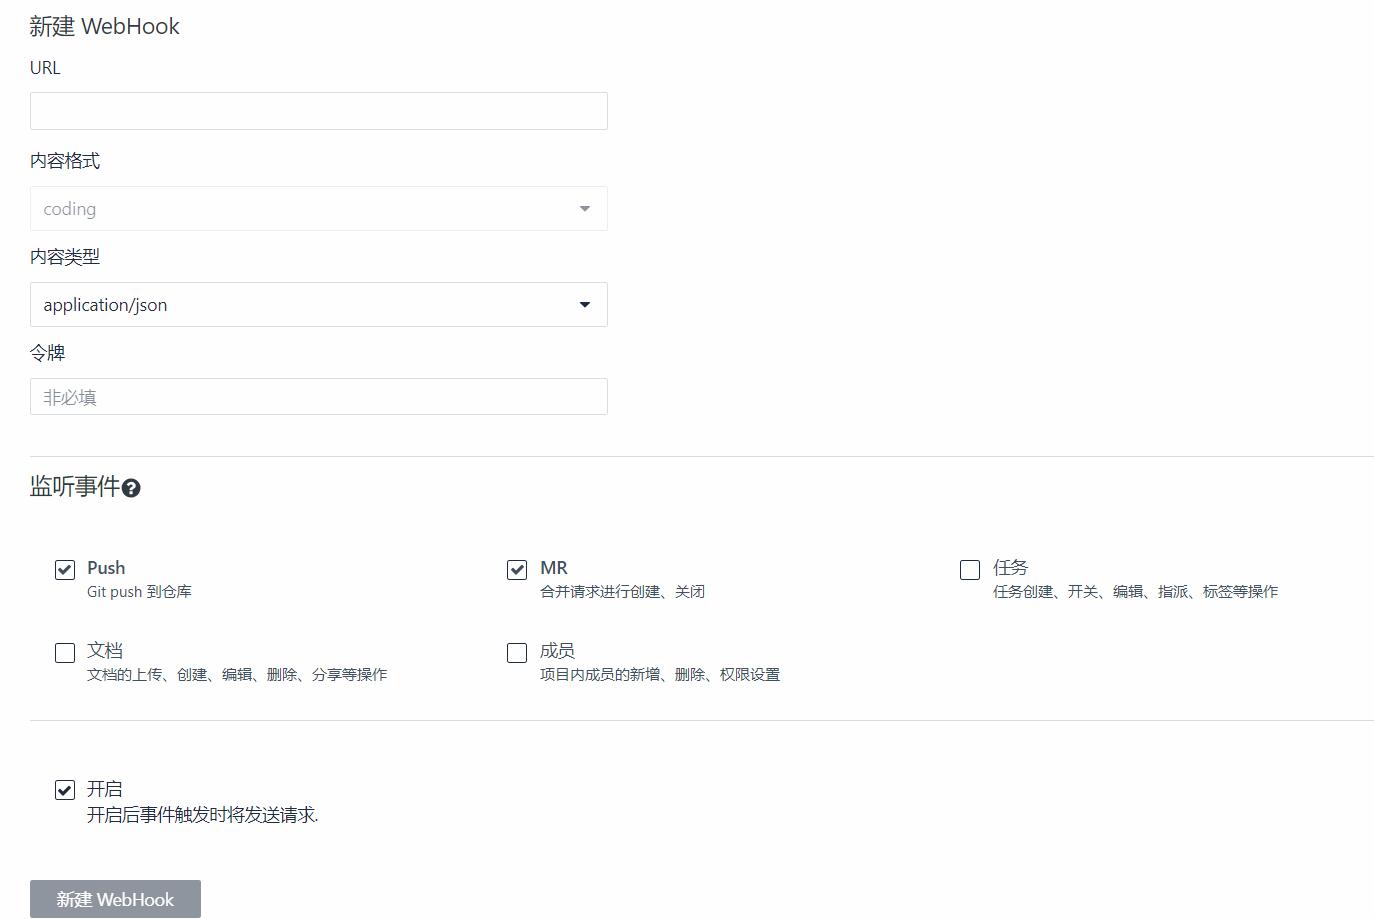
URL: WebHook访问的地址
内容类型: 选application/json
监听事件: 根据需要勾选
创建好后我们查看 Coding WebHook 开发文档 的 Push事件 的相关说明,了解请求信息的键值含义:
| Key | Value |
|---|---|
| hook_id | 当前 WebHook 的 ID |
| hook | 当前 WebHook 的配置数据 |
| ref | 推送的 commit sha |
| before | 该分支之前的 commit sha |
| after | 该分支新的 commit sha |
| compare | compare 的 url 地址 |
| commits | 更新的 commits 内容 |
| head_commit | 最新的 commit 内容 |
| pusher | 推送者 |
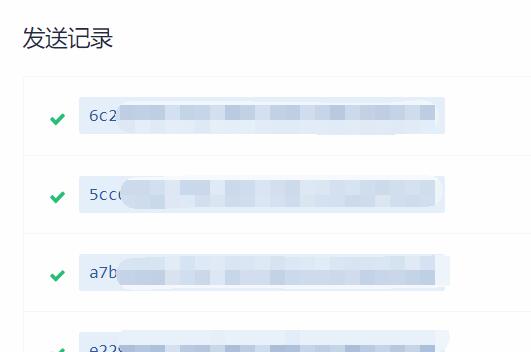
然后,你就可以去项目里随便触发一次 push 事件,之后到 “设置”-“WebHook”-“修改”里,点击发送记录,就可以查看 POST 请求的完整 JSON 数据。
这是一段请求例子:
请求头部
Request URL: http://yourserver/test/test_webhook.php
Request method: POST
User-Agent: Coding.net Hook
X-Coding-Event: push
X-Coding-Delivery: 6c228fe0-6f10-4f4e-85d5-88fe59b55534
X-Coding-WebHook-Version: v2
X-Coding-Signature: sha1=6acb186554d58b5e61c004ad2396601142fa9fdf
请求内容(部分信息已隐藏)1
2
3
4
5
6
7
8
9
10
11
12
13
14
15
16
17
18
19
20
21
22
23
24
25
26
27
28
29
30
31
32
33
34
35
36
37
38
39
40
41
42
43
44
45
46
47
48
49
50
51
52
53
54
55
56
57
58
59
60
61
62
63
64
65
66
67
68
69
70
71
72
73
74
75
76
77
78
79
80
81
82
83
84
85
86
87
88
89
90
91
92{
"ref": "refs/heads/master",
"before": "a2099911911e3f8a0090e5351b01b8952f5068fd",
"after": "3638f90bf79b2eb02259c4a2f594e362953a464d",
"created": false,
"deleted": false,
"compare": "...",
"commits": [
{
"id": "3638f90bf79b2eb02259c4a2f594e362953a464d",
"distinct": false,
"message": "push的信息\n",
"timestamp": 1543366074000,
"url": "相关commit页面",
"author": {
"name": "CrazyKidCN",
"email": "[email protected]",
"username": "..."
},
"committer": {
"name": "CrazyKidCN",
"email": "[email protected]",
"username": "..."
},
"added": [],
"removed": [
"testfile.txt" //此次push删除了一个文件
],
"modified": []
}
],
"head_commit": {
"id": "3638f90bf79b2eb02259c4a2f594e362953a464d",
"distinct": false,
"message": "test add push\n",
"timestamp": 1543366074000,
"url": "...",
"author": {
"name": "CrazyKidCN",
"email": "[email protected]",
"username": "..."
},
"committer": {
"name": "CrazyKidCN",
"email": "[email protected]",
"username": "..."
},
"added": [],
"removed": [
"testfile.txt"
],
"modified": []
},
"pusher": { //推送人信息
"name": "...",
"email": "...",
"username": "..."
},
"sender": {
"id": ..., //Coding 用户ID
"login": "...", //Coding 用户名称
"avatar_url": "...", //Coding 用户头像
"url": "...",
"html_url": "...",
"name": "CrazyKidCN",
"name_pinyin": ""
},
"repository": {
"id": ..., //repo id
"name": "...", //repo名称
"full_name": "", //repo全名
"owner": { //repo所有者
"id": ...,
"login": "CrazyKidCN",
"avatar_url": "https://dn-coding-net-production-static.qbox.me/837a90ac-5efb-4f67-bbed-11178d80c683.jpg?imageMogr2/auto-orient/format/jpeg/crop/!596x596a0a0",
"url": "...",
"html_url": "https://coding.net/u/CrazyKidCN",
"name": "CrazyKidCN",
"name_pinyin": ""
},
"private": true,
"html_url": "...", //repo地址(html超链接形式)
"description": "",
"fork": false,
"url": "...", //repo地址
"created_at": 1523760758000,
"updated_at": 1523760758000,
"clone_url": "...",
"ssh_url": "...",
"default_branch": "master"
}
}
然后我们就可以开始写 php 来解析其中的 json 了。下面以实现触发 push 事件后自动部署项目为例子,我的代码:
1 | $header = get_all_header(); //获取头信息 |
区别于网上Linux系统的教程,最关键的一句话是:1
$pull = 'cd C:/test && "C:\Program Files\Git\cmd\git.exe" pull 2>&1';
其中, cd C:/test 为切换到你的项目部署目录, “C:\Program Files\Git\cmd\git.exe” pull 等同于 git pull,只不过手动指定了git程序的地址。最后的 2>&1 解决无法正确输出 $out 的问题。
这样,就实现了push后自动部署项目了。。。
后续:进一步获取commit中文件的变动详情,从而实现更多针对性的操作,我的代码:
1 | for ($j=0; $j<count($json["commits"]); $j++){ //由于一次可push多个commit,所以要遍历数组 |
以上!
由于本人仍在学习 git 和 php ,文章难免存在错误,请各位大佬多多指教,感谢ww
博客的第一篇文章完工,成就感满满的呢~